준비물 : Anaconda, Pytorch, torch2trt, GPU(본 포스팅에서는 3080*4ea)
TL;DR → 필자 깃허브의 torchtrt_dataparallel
준비단계
먼저, 아나콘다를 통해서 아래와 같이 환경 설정을 수행한 후 본 포스팅을 시작하면 되겠다. 최종적인 환경도 깃허브(링크)에 yml 파일로 올려두었으니 그걸로 바로 설치해도 무방하다.
conda create -n torch2trt_dataparallel python=3.8
conda activate torch2trt_dataparallel
그 다음 파이토치를 아래와 같이 설치하고(지금은 2.0 이 stable 버전이지만, torch2trt 호환도 그렇고 필자는 쫄보라서 1.11.0 설치한다. 2.0을 시도해 보는것도 권장한다)
conda install pytorch==1.11.0 torchvision==0.12.0 torchaudio==0.11.0 cudatoolkit=11.3 -c pytorch상기 설치까지 마쳤으면 아래의 torch2trt 설치를 수행한다. tensorrt 최신 버전은 cuda12 디펜던시(cublas for cuda12, cudnn for cuda12 등)를 자동으로 설치하니까 어지간하면 8.5.1.7로 지정해주자. 마찬가지로 버전업을 위한 여러 시도는 권장된다.
python -m pip install tensorrt==8.5.1.7
python -m pip install packaging onnx_graphsurgeon tqdm
git clone https://github.com/NVIDIA-AI-IOT/torch2trt
cd torch2trt
python setup.py install
TensorRT 모델 변환
먼저, 싱글 프로세스로 tensorRT 변환을 해서 작동을 확인한다. torch2trt 예제를 참고하여 아래와 같이 compile_model이라는 함수를 선언해주고(지금은 그냥 resnet50을 함수마다 불러서 컴파일 하게 했지만, 함수 callable(및 **kwargs)을 넘기는 방식으로 일반화 가능),
import torch
from torch.utils.data import DataLoader, Dataset
from torchvision.models import resnet50

from torch2trt import torch2trt

import numpy as np

import time

from tqdm import tqdm

def compile_model(batch_size, device, input_shape=(3,224,224), checkpoint=None):
    with torch.no_grad():
        original_model = resnet50().cuda(device=f'cuda:{device}').eval()
        if checkpoint is not None:
            ckp = torch.load(checkpoint, map_location=f'cuda:{device}')
            original_model.load_state_dict(ckp)
        st = time.time()
        print("Converting")
        model_trt = torch2trt(original_model, [torch.randn(batch_size,*input_shape).cuda(device=f'cuda:{device}')],
            fp16_mode=True, use_onnx=True, max_batch_size=batch_size)
        print(f"Done in {time.time()-st:0.5f}sec")
    del original_model
    return model_trt
실험에 사용할 수 있게 dataset을 선언해 준 다음.
class dummy_dataset(Dataset):
    def __init__(self):
        super().__init__()

    def __getitem__(self, index):
        return torch.randn(3, 224, 224), torch.randint(0, 1000, (1,)).item()

    def __len__(self):
        return 10240
상기 데이터셋과 모델을 이용해서 간단한 inference loop을 수행하는 함수를 아래와 같이 작성해준다.
def run_single_inference():
dataset = dummy_dataset()
dataloader = DataLoader(dataset, batch_size=32, shuffle=False, num_workers=16)
model = compile_model(batch_size=32, device=0)
model.eval()
st = time.time()
for data, target in tqdm(dataloader):
_ = model(data.cuda(device=0))
del model
print(f"Done in {time.time()-st:0.5f}sec")
if __name__ == "__main__":
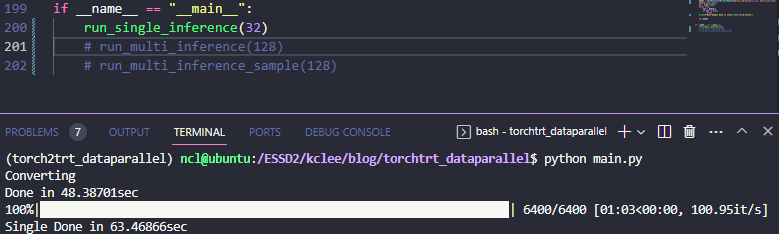
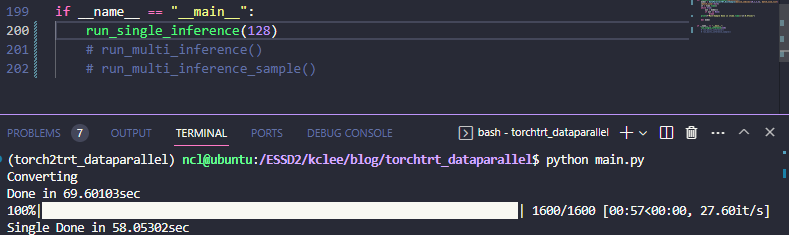
run_single_inference()총 10240개의 랜덤 노이즈 입력에 대해서 위와 같이 성공적으로 실행되는것을 확인할 수 있다.
Process,Queue 를 이용한 다중 프로세스 실행 및 통신
본 포스팅에서 제목으로 제시한 기능을 구현하기 위해서 multiprocessing 의 Process와 Queue 기능을 사용할 예정인데, 사실 각 지피유별로 독립적인 프로세스를 spawn 하는 구조를 사용할 것이기 때문에, 엄밀히 말하면 DataParallel보다는 DistributedDataParallel에 더 가까울 것 같기는 하다.
기본적으로 Queue를 사용한 다중 프로세스 사용을 아래와 같이 이루어지는데,
from multiprocessing import Process, Queue

def pusher(inpq, outq):
    for i in range(10):
        inpq.put(i)
        print(outq.get())
    inpq.put(None)

def popper(inpq, outq):
    while True:
        item = inpq.get()
        if item is None:
            break
        else:
            outq.put(item)

def test_queue():
    inpq = Queue()
    outq = Queue()
    p1 = Process(target=pusher, args=(inpq,outq,))
    p2 = Process(target=popper, args=(inpq,outq,))
    p1.start()
    p2.start()
    p1.join()
    p2.join()

if __name__ == "__main__":
    test_queue()
1. input과 output의 통신 채널이 될 inpq와 outq를 선언하고,
2. 각각 pusher, popper로 명명된 역할 함수를 타겟으로 하는 Process p1과 p2를 inpq,outq 를 공유하도록 생성해준 다음
3. 각 Process를 start 및 본 프로세스가 child process가 끝나기 전 먼저 끝나는 일이 안 생기도록 join 해준다.
그러면, p1 프로세스는 pusher 기능을 역할로 삼아서 inpq에 먼저 데이터를 집어넣은 다음(실제 예제에서는 데이터 입력에 해당), popper 역할을 맡은 p2 프로세스가 inpq에서 데이터를 받아 그걸 다시 outq로 집어넣어주고, 이걸 기다리던 p1이 outq에서 데이터를 꺼내 프린트 하는 식으로 프로세스 간의 통신이 이뤄진다.
최종 실행 결과는 따라서, 아래와 같이 나오게 된다.
TRT DataParallel
이제 이걸 기반으로 TensorRT 모델을 병렬로 돌려보자. 먼저, 위의 popper 역할에 해당하는 batch_consumer를 아래와 같이 선언해주자.
def batch_consumer(device, batch_size, data_queue, result_queue, compile_monitor):
    torch.cuda.set_device(device)
    model = compile_model(batch_size=batch_size, device=device)
    compile_monitor.put(True)
    while True:
        inp = data_queue.get()
        if inp is None:
            break
        out = model(inp.cuda(device=f'cuda:{device}')).cpu()
        result_queue.put(out)
batch_consumer는 디바이스 인덱스를 받아서 해당 디바이스에 tensorRT 컴파일을 수행하고 컴파일 종료 시그널을 컴파일 모니터 큐에 넣은 data_queue.get() 을 대기한다. data_queue에서 입력이 들어올 때마다 해당 배치 입력에 대한 model inference를 수행하고, 이 결과물을 result_queue에 다시 put 하는걸 반복한다.
위와 같이 consumer를 정의한 다음 이걸 사용자가 호출할 수 있는 형상으로 아래와 같이 pusher 형상을 포함한 클래스를 하나 정의해 줄 수 있다.
class DataParallelTRT:
    def __init__(self, device_indices, total_batch_size=None, batch_size_list=None):
        assert total_batch_size is not None or batch_size_list is not None, "Either total_batch_size or batch_size_list should be provided"
        if total_batch_size is not None and batch_size_list is not None:
            print("Both total_batch_size and batch_size_list are provided. batch_size_list will be used.")
        parallel_list =[]
        data_queue_list = []
        result_queue_list = []
        compile_monitor = Queue()

        self.model_list = {}
        if batch_size_list is None:
            batch_size_list = [total_batch_size//len(device_indices)]*len(device_indices)

        parallel_list = []
        for index in device_indices:
            data_queue_list.append(Queue())
            result_queue_list.append(Queue())
            parallel_list.append(Process(target=batch_consumer, args=(index, batch_size_list[index], data_queue_list[-1], result_queue_list[-1],compile_monitor,)))
            parallel_list[-1].start()

        for _ in range(len(device_indices)):
            compile_monitor.get()

        self.batch_index_list = [0, *np.cumsum(batch_size_list)]
        self.data_queue_list = data_queue_list
        self.result_queue_list = result_queue_list
        self.parallel_list = parallel_list


    def forward(self, x):
        # x: (batch_size, ...)
        for idx, data_queue in enumerate(self.data_queue_list):
            data_queue.put(x[self.batch_index_list[idx]:self.batch_index_list[idx+1]])
        output = []
        for result_queue in self.result_queue_list:
            output.append(result_queue.get())
        return torch.cat(output, dim=0)

    def __del__(self):
        for data_queue in self.data_queue_list:
            data_queue.put(None)
        for parallel in self.parallel_list:
            parallel.join()

    def __call__(self, x):
        return self.forward(x)
제일 먼저 초기화 단계를 살펴보면
parallel_list =[]
data_queue_list = []
result_queue_list = []
compile_monitor = Queue()

self.model_list = {}
if batch_size_list is None:
    batch_size_list = [total_batch_size//len(device_indices)]*len(device_indices)

parallel_list = []
for index in device_indices:
    data_queue_list.append(Queue())
    result_queue_list.append(Queue())
    parallel_list.append(Process(target=batch_consumer, args=(index, batch_size_list[index], data_queue_list[-1], result_queue_list[-1],compile_monitor,)))
    parallel_list[-1].start()

for _ in range(len(device_indices)):
    compile_monitor.get()
주어진 batch_size_list(각 디바이스 별 할당할 배치사이즈) 혹은 총 batch_size를 기반으로, 지정한 device_indices들에 대해서 batch_consumer 프로세스를 생성 및 start 해준다. 이때, 상기 batch_consumer 의 compile_model 부분이 시간이 오래 걸리게 되므로, 실제 수행 자체에는 문제가 없지만 정확한 시간 측정을 위해 compile_monitor 큐를 활용하여 전체 컴파일을 대기한다. 서로 다른 디바이스에서 아래와 같이 모델 컴파일을 병렬로 진행하기 때문에, 싱글과 컴파일 시간은 거의 동일하게 된다.
위와 같이 초기화를 마친 다음 호출 메소드를 정의해주는데,
def forward(self, x):
    # x: (batch_size, ...)
    for idx, data_queue in enumerate(self.data_queue_list):
        data_queue.put(x[self.batch_index_list[idx]:self.batch_index_list[idx+1]])
    output = []
    for result_queue in self.result_queue_list:
        output.append(result_queue.get())
    return torch.cat(output, dim=0)

def __call__(self, x):
    return self.forward(x)
입력 텐서 x(Batch, ... 형태)가 들어올 때마다 인덱스별로 잘라서 data_queue에 넣어주고, result_queue를 기다려서 하나로 합친 output을 리턴하게 작성한다. 이렇게 하면, 기존 model 단일로 사용할때랑 동일하게 사용할 수 있다. nn.Module 상속을 안해서 모든게 같지는 않지만 일단은 forward는 동일하게 사용할 수 있다(;).
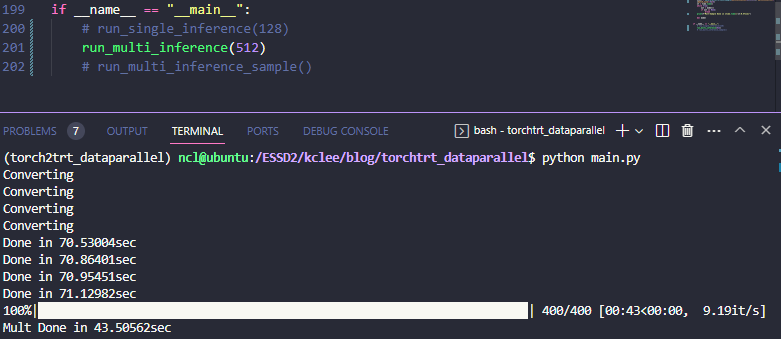
이제 상기 DataParallelTRT를 사용하는 인퍼런스 코드를 아래와 같이 짠 다음 실행해주면,
def run_multi_inference():
dataset = dummy_dataset()
dataloader = DataLoader(dataset, batch_size=128, shuffle=False, num_workers=16)
model = DataParallelTRT(device_indices=[0,1,2,3], batch_size_list=[32,32,32,32])
st = time.time()
for data, target in tqdm(dataloader):
_ = model(data)
for data_queue in model.data_queue_list:
data_queue.put(None)
print(f"Done in {time.time()-st:0.5f}sec")
del model
if __name__ == "__main__":
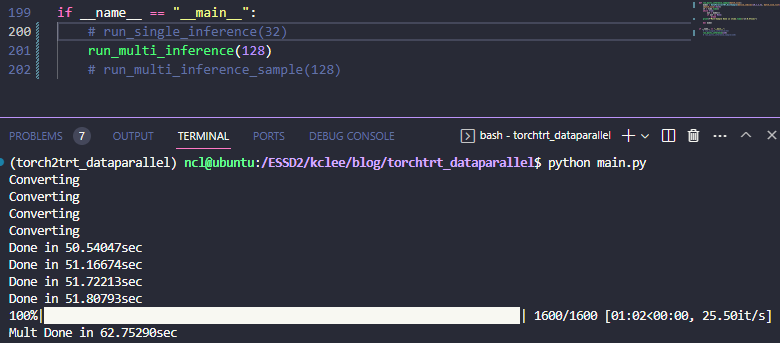
run_multi_inference()결과는 아래와 같이 나온다
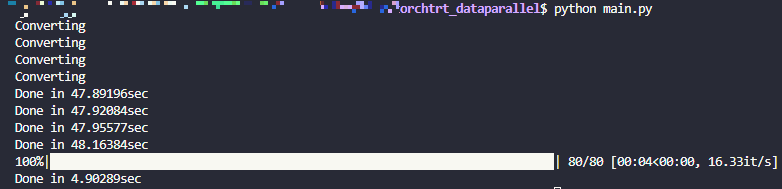
61.24it/sec -> 65.32=16.33*4 it/sec 니까 대략 6%(;;) 정도의 가속인걸 확인할 수 있다. 이게 queue 작동이 피클링을 포함해서 느린가 싶어서 아래와 같이 Distributed Sampler를 활용하는 형식으로도 개조해봤다.
def batch_consumer_dist(device, batch_size, data_queue, result_queue, compile_monitor):
from torch.utils.data.distributed import DistributedSampler
torch.cuda.set_device(device)
model = compile_model(batch_size=batch_size, device=device)
dataset = dummy_dataset()
dataloader = DataLoader(dataset, batch_size=batch_size, shuffle=False, num_workers=4, sampler=DistributedSampler(dataset, num_replicas=4, rank=device))
compile_monitor.put(True)
pbar = tqdm(dataloader) if device==0 else dataloader
for inp, target in pbar:
_ = data_queue.get()
out = model(inp.cuda(device=f'cuda:{device}')).cpu()
result_queue.put(out)
result_queue.put(None)
class DataParallelTRT_DistSample:
def __init__(self, device_indices, total_batch_size=None, batch_size_list=None):
...
def forward(self):
# x: (batch_size, ...)
for idx, data_queue in enumerate(self.data_queue_list):
data_queue.put(idx)
output = []
for result_queue in self.result_queue_list:
out = result_queue.get()
output.append(out)
if out is None:
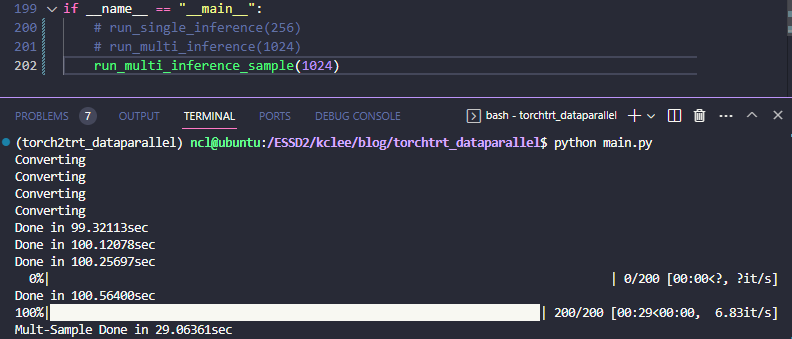
return None
return torch.cat(output, dim=0)
def __call__(self):
return self.forward()
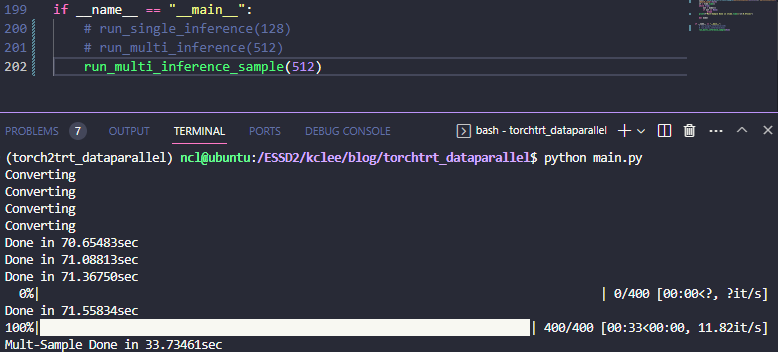
def run_multi_inference_sample():
model = DataParallelTRT_DistSample(device_indices=[0,1,2,3], batch_size_list=[32,32,32,32])
st = time.time()
while True:
out = model()
if out is None:
break
print(f"Done in {time.time()-st:0.5f}sec")
del model
if __name__ == "__main__":
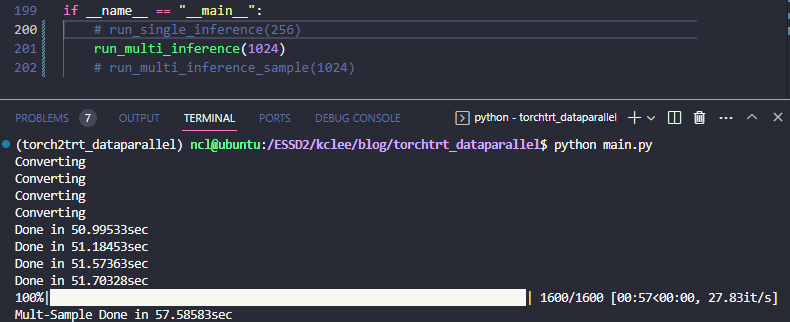
run_multi_inference_sample()이런식으로 작성하면, 인풋을 각 프로세스에 별도로 주는게 아니라서 서비스 형식으로 묶는 경우에는 조금 애로사항이 있긴 하겠지만, 데이터 로딩 자체는 좀 더 효율적으로 될 것이라 기대해볼 수 있다. 실제로도 아래의 결과와 같이
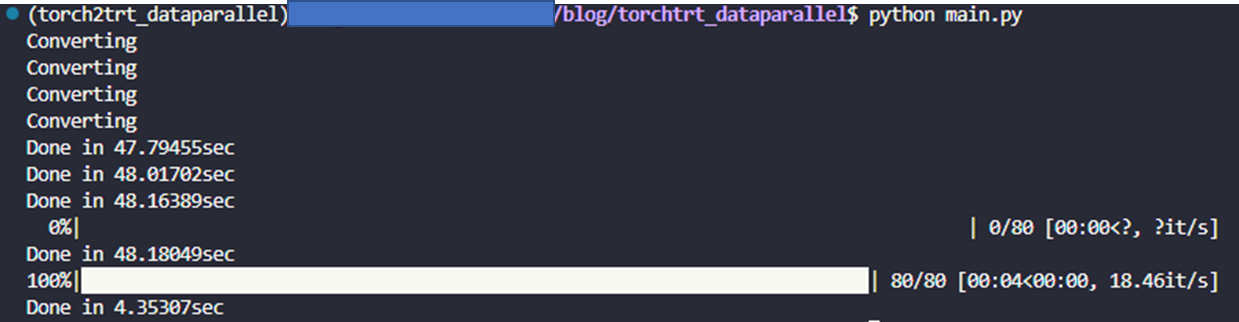
61.24it/sec -> 73.84=18.46it/sec 로 대략 20% 정도 가속이 되는걸 확인할 수 있다.
최종적으로, 데이터셋 길이를 20배씩 늘려서 비교해보면 아래와 같다.
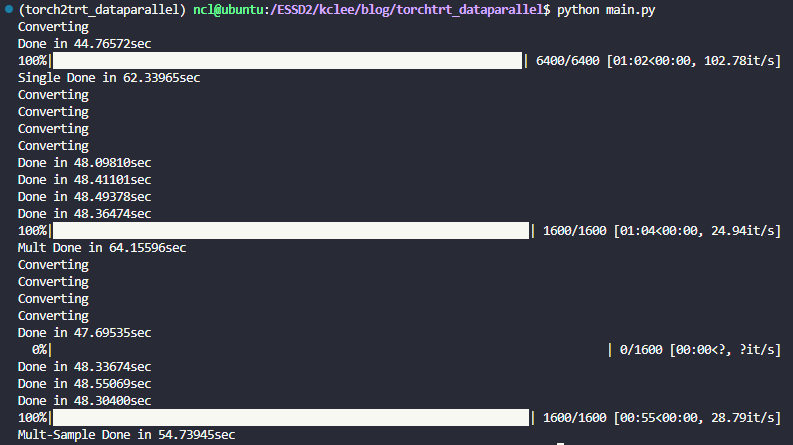
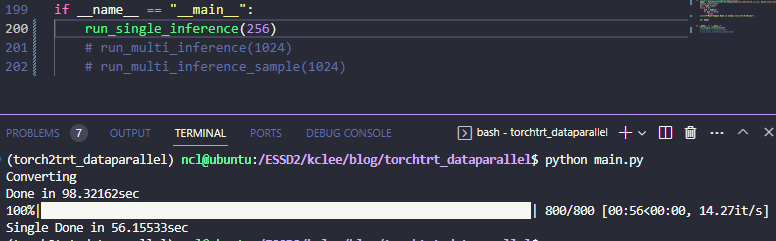
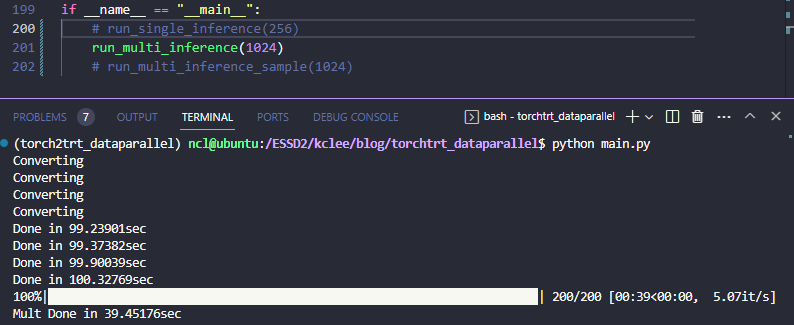
batch/GPU를 128로 해서 더 큰 배치 결과를 보려고 했는데, 그러니까 compile 단계에서 유독 0번 GPU 만 OOM이 뜨는걸 발견했다. 컴파일 때 set_device를 해서 고쳐지나 했는데 그거보다는 single_inference 한 다음에 찌꺼기가 잘 release 되지 않는거 같다. 그래서 상기 결과 및 128 batch/GPU, 256 batch/GPU 를 각각 실험 케이스마다 돌려보면 아래와 같다.
| Batch/GPU | Single | DataParallel | DataParallel - sample |
| 32 | 63.46866 ( x 1) | 62.75290 ( x 1.01) | 57.58583 ( x 1.10) |
| 128 | 58.05302 (x 1.09) | 43.50562 ( x 1.46) | 33.73461 ( x 1.88) |
| 256 | 56.15533 (x 1.13) | 39.45176 ( x 1.61) | 29.06361 ( x 2.18) |
배치 사이즈가 커질수록 가속 효과가 두드러지는걸 확인할 수 있다. single 자체도 batching의 효과를 받기는 하지만 그 격차는 batch_size에 비례하여 점점 넓어진다.
결론적으로, 상기 코드는 TensorRT를 대규모 batch 단위로 처리하려고 할 때 DataParallel의 대용으로 사용할만 할 것 같다. 물론 compile을 안 한 네이티브 DataParallel 과, 아예 별도 프로세스로 데이터를 나눠서 처리하는 것과도 비교해야 맞기는 하겠지만 본 포스팅에서는 거기까지는 다루지 않는다....
상기 코드를 실험용으로 사용하는 것은 자유이며 블로그 댓글이나 깃허브 이슈도 언제든 환영이다. :)
'잡지식 저장고 > Pytorch' 카테고리의 다른 글
| torch.nn.Parameter 에 관해서 (0) | 2021.04.07 |
|---|---|
| detectron2 에서 Faster R-CNN RPN에 GradCAM 붙이기 (0) | 2021.03.30 |

댓글